How To Clean Plastic Weed Grinder
Ronan Farrow
Mar 24, 2025 · 3 min read
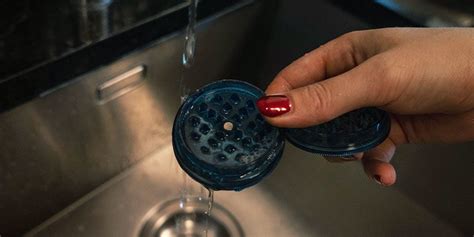
Table of Contents
How to Clean Your Plastic Weed Grinder: A Step-by-Step Guide
Cleaning your weed grinder might not be the most glamorous task, but it's essential for maintaining its functionality and ensuring a clean, enjoyable smoking experience. A dirty grinder can harbor old resin, leading to a less potent and potentially less flavorful smoke. This guide provides a comprehensive approach to cleaning your plastic grinder, ensuring it's sparkling clean in no time.
Why Clean Your Grinder?
Before diving into the cleaning process, let's understand why regular cleaning is crucial:
- Improved Functionality: A clogged grinder won't grind efficiently, leading to frustration and uneven grinds.
- Enhanced Flavor: Old resin can impact the taste of your herb, leaving a lingering unpleasantness.
- Hygiene: A clean grinder is a hygienic grinder, preventing the buildup of bacteria and other contaminants.
- Extended Lifespan: Regular cleaning helps prolong the life of your grinder, preventing damage from resin buildup.
Essential Tools and Materials
Gather these items before you begin:
- Isopropyl alcohol (90% or higher): This is the most effective solvent for removing resin.
- Salt: Acts as an abrasive to help scrub away stubborn resin.
- Small bowl or container: To hold your grinder parts and cleaning solution.
- Paper towels or microfiber cloth: For drying.
- Toothbrush (old one): For scrubbing hard-to-reach areas.
- Warm water: For rinsing.
The Cleaning Process: A Step-by-Step Guide
Follow these steps for a thorough cleaning:
1. Disassemble Your Grinder
Carefully take apart your grinder into its individual components. This ensures thorough cleaning of every part.
2. Prepare the Cleaning Solution
In your bowl, combine isopropyl alcohol and salt. The ratio isn't critical; a generous amount of salt in the alcohol will do the trick. The salt acts as a scrubbing agent, helping to loosen and remove the resin.
3. Soak and Scrub
Submerge the grinder parts in the alcohol and salt solution. Let them soak for at least 30 minutes, or longer for particularly stubborn resin. After soaking, use your toothbrush to gently scrub all surfaces, paying close attention to crevices and areas where resin tends to accumulate.
4. Rinse Thoroughly
Once you've scrubbed everything, rinse all the parts thoroughly under warm running water. Ensure all traces of alcohol and salt are removed.
5. Dry Completely
Dry the grinder parts completely using paper towels or a microfiber cloth. Make sure they are completely dry before reassembling to prevent mold or mildew growth. Allowing them to air dry is also an option.
6. Reassemble
Once everything is completely dry, reassemble your grinder carefully.
Maintaining a Clean Grinder
To keep your grinder clean and functional, consider these tips:
- Regular Cleaning: Clean your grinder after every few uses to prevent resin buildup.
- Quick Wipes: After each use, quickly wipe down the exterior of your grinder with a damp cloth to remove any loose debris.
- Avoid Over-Packing: Don't overpack your grinder, as this can lead to more resin build-up.
By following these steps, you can keep your plastic weed grinder clean, efficient, and ready for your next use. Remember, a clean grinder is a happy grinder!
Featured Posts
Also read the following articles
| Article Title | Date |
|---|---|
| How To Get Married In Kentucky Without A Ceremony | Mar 24, 2025 |
| How To Cold Crash Mead | Mar 24, 2025 |
| How To Dye Seat Belts | Mar 24, 2025 |
| How To Get Gun Back From Police Florida | Mar 24, 2025 |
| How To Divide Property | Mar 24, 2025 |
Latest Posts
-
How Long Can Fish Stay In A Bucket
Apr 05, 2025
-
How Long Can Eels Live Out Of Water
Apr 05, 2025
-
How Long Can Bondo Be Left Unpainted
Apr 05, 2025
-
How Long Can Bees Stay In A Nuc
Apr 05, 2025
-
How Long Can An Outboard Run Without Water
Apr 05, 2025
Thank you for visiting our website which covers about How To Clean Plastic Weed Grinder . We hope the information provided has been useful to you. Feel free to contact us if you have any questions or need further assistance. See you next time and don't miss to bookmark.

