How To Make Cabinets Go To Ceiling
Ronan Farrow
Mar 25, 2025 · 3 min read
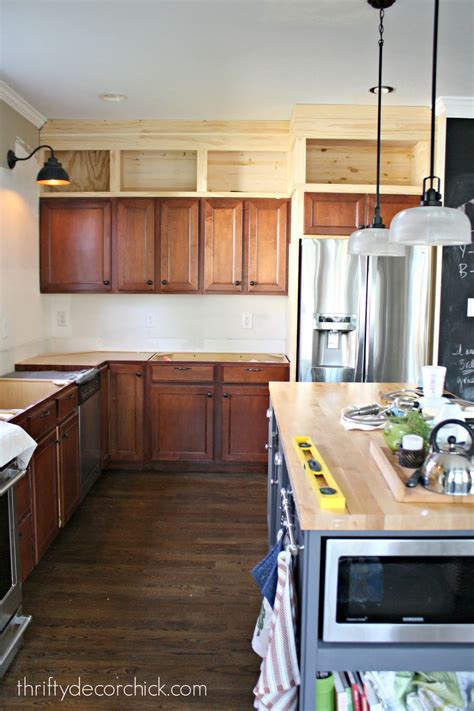
Table of Contents
How to Make Cabinets Go to the Ceiling: A Comprehensive Guide
So you're dreaming of a kitchen or bathroom with sleek, ceiling-height cabinets? Maximizing your vertical space not only looks stunning but also provides incredible storage solutions. This guide will walk you through the process of installing cabinets that reach all the way to the ceiling, maximizing your storage potential and elevating your home's design.
Planning and Preparation: The Foundation of Success
Before you even think about grabbing a drill, careful planning is essential for a successful project. This phase sets the stage for a seamless installation.
1. Measure Twice, Cut Once (and then measure again!)
Accurate measurements are paramount. Measure the height of your walls from floor to ceiling in multiple locations, accounting for any inconsistencies. Also, carefully measure the width of the space where your cabinets will go. Consider existing features like electrical outlets, plumbing, and windows. Slight variations in wall height are common, so be prepared to adjust accordingly.
2. Cabinet Selection: Choosing the Right Fit
Choosing the right cabinets is crucial. You'll likely need to order custom cabinets to achieve a perfect ceiling-height fit, or carefully select standard cabinets and add crown molding or a filler piece to achieve the desired look. Consider the cabinet material (wood, melamine, etc.), style, and door hardware. A good cabinet retailer can help you navigate the options.
3. Gather Your Tools and Materials
Having all the necessary tools and materials readily available will streamline the process. You'll need:
- Level: Essential for ensuring perfectly aligned cabinets.
- Stud finder: Locate wall studs for secure cabinet mounting.
- Drill: With various drill bits for pilot holes and cabinet screws.
- Screwdriver (or drill with screwdriver bit): For securing cabinets and hardware.
- Measuring tape: For accurate measurements throughout the installation.
- Safety glasses and gloves: To protect your eyes and hands.
- Cabinet screws: Choose screws appropriate for your cabinet material and wall construction.
- Shims: To adjust for uneven walls.
- Caulk: To seal gaps and ensure a professional finish.
- Crown molding (optional): For a finished look at the top of the cabinets.
- Filler piece (optional): To close any gaps between the cabinets and the ceiling.
Installation: A Step-by-Step Approach
With your planning complete, it's time to install those cabinets!
1. Installing the Base Cabinets
Begin by installing your base cabinets, ensuring they are level and plumb. This provides a solid foundation for the upper cabinets. Use shims to adjust for any unevenness in the floor or walls.
2. Installing the Upper Cabinets
Carefully lift and install the upper cabinets, making sure to align them with the base cabinets and level them thoroughly. Use the stud finder to locate wall studs and secure the cabinets directly to them for maximum support. This is crucial for stability and safety.
3. Addressing the Gap Between Cabinets and Ceiling
This is where you will use either custom-ordered cabinets that precisely fit the space or add crown molding and/or a filler piece. If using crown molding, ensure it is precisely cut and mitered for a professional finish. For filler pieces, carefully measure and cut the piece to fit snugly, and securely fasten it to the cabinet.
4. Final Touches and Finishing
Once all the cabinets are securely installed, apply caulk to seal any gaps between the cabinets and the wall. Then, install cabinet doors and hardware. Take your time with this step, ensuring everything is properly aligned and functional.
Beyond the Basics: Adding Personality
Don't forget the finishing touches! Consider adding lighting to illuminate your beautiful new cabinets and showcase their contents. Think about cabinet hardware – knobs, pulls, and handles – to complement your style.
Conclusion: Reaching New Heights in Storage and Style
By following these steps, you can confidently install ceiling-height cabinets, creating both stunning aesthetics and maximizing your storage potential. Remember, careful planning and attention to detail are key to a successful project. With patience and the right tools, you'll be enjoying your new, beautiful, and highly functional cabinets in no time!
Featured Posts
Also read the following articles
| Article Title | Date |
|---|---|
| How To Make Cheap Garland Look Expensive | Mar 25, 2025 |
| How To Play Cypress Point | Mar 25, 2025 |
| How To Jack Up A Boat Trailer | Mar 25, 2025 |
| How To Neutralize Mineral Spirits | Mar 25, 2025 |
| How To Make A Table Leaf | Mar 25, 2025 |
Latest Posts
Thank you for visiting our website which covers about How To Make Cabinets Go To Ceiling . We hope the information provided has been useful to you. Feel free to contact us if you have any questions or need further assistance. See you next time and don't miss to bookmark.

