How To Make Garden Rows With A Tiller
Ronan Farrow
Mar 25, 2025 · 3 min read
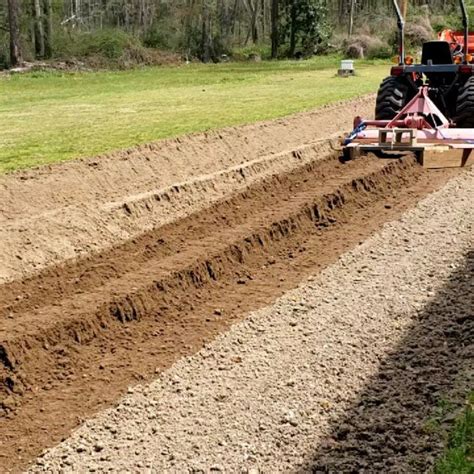
Table of Contents
How to Make Garden Rows with a Tiller: A Step-by-Step Guide
Creating perfectly straight and evenly spaced garden rows is crucial for efficient planting and maximizing your yield. While you can achieve this manually, using a tiller significantly speeds up the process and reduces physical strain. This guide provides a step-by-step approach to making garden rows with a tiller, ensuring a successful and rewarding gardening experience.
Preparing for the Tilling Process
Before you even start your tiller, several preparation steps ensure a smooth and efficient operation. These steps are crucial for both your safety and the quality of your rows.
1. Planning Your Garden Layout
- Measure and Mark: Determine the size and shape of your garden and plan the layout of your rows. Consider the sun exposure and the needs of your specific plants. Using string and stakes to create straight lines is incredibly helpful in achieving uniform rows later on. Proper planning is half the battle.
2. Clearing the Area
- Remove Debris: Thoroughly clear the area of any rocks, sticks, weeds, and other debris. These can damage your tiller and create uneven rows. A pre-till cleanup saves you time and frustration down the line.
3. Choosing the Right Tiller
- Consider the Size: Select a tiller appropriate for your garden's size. A smaller tiller is suitable for smaller gardens, while larger tillers are better for larger areas. Consider your soil type. Heavy clay may require a more powerful tiller.
Tilling Your Garden Rows: A Step-by-Step Process
Now that you're prepared, let's delve into the actual tilling process. Following these steps ensures straight, well-tilled rows.
1. Initial Tilling
- Pass 1: Make a first pass with your tiller, going over the entire area to break up the soil. This initial tilling loosens compacted soil, making subsequent passes easier and ensuring uniform depth.
2. Creating the Rows
- Pass 2 (and beyond): Now, using your marked lines as a guide, make subsequent passes with your tiller, focusing on creating even furrows for your rows. Maintain a consistent speed and depth to achieve uniform rows. Overlapping slightly can improve evenness.
3. Refining the Rows
- Final Pass: After creating the furrows, make a final pass alongside each row to refine the shape and remove any remaining clumps of soil. This step guarantees straight, clean rows ready for planting.
Maintaining Your Tiller and Garden
-
Cleaning: After tilling, always clean your tiller thoroughly to remove any soil or debris that has clung to it. This extends the life of your equipment.
-
Post-Tilling Care: Once your rows are complete, consider incorporating organic matter like compost into the soil for added nutrients. This gives your plants the best possible start.
Troubleshooting Common Issues
Here are answers to frequently asked questions (FAQs) about tilling and maintaining your garden rows:
- Uneven Rows: This often results from inconsistent tiller speed or depth. Maintain a constant speed and depth for even furrows.
- Rocks or Debris: Thoroughly clear the area before tilling to avoid tiller damage and uneven rows.
- Compacted Soil: Consider multiple passes if you have heavy clay soil, or use a heavier-duty tiller.
By following this comprehensive guide, you'll confidently create perfect garden rows using a tiller, setting the stage for a bountiful harvest. Remember that proper preparation and attention to detail are key to success. Happy gardening!
Featured Posts
Also read the following articles
| Article Title | Date |
|---|---|
| How To Replace Bunks On Boat Trailer | Mar 25, 2025 |
| How To Keep Rv Refrigerator Door Closed While Traveling | Mar 25, 2025 |
| How To Paint A Gun Slide | Mar 25, 2025 |
| How To Read Carrier Model Number | Mar 25, 2025 |
| How To Plow Gravel Driveway | Mar 25, 2025 |
Latest Posts
Thank you for visiting our website which covers about How To Make Garden Rows With A Tiller . We hope the information provided has been useful to you. Feel free to contact us if you have any questions or need further assistance. See you next time and don't miss to bookmark.

