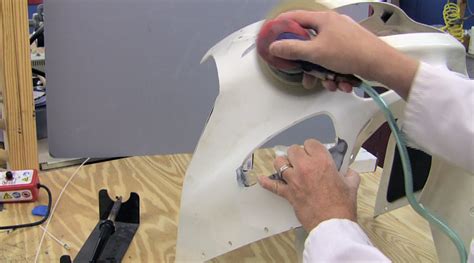
How To Repair Fairings
Ronan Farrow
Mar 25, 2025 · 4 min read

Table of Contents
How to Repair Motorcycle Fairings: A Comprehensive Guide
Motorcycle fairings, those sleek plastic panels that give your bike its distinctive look, are unfortunately prone to damage. Whether it's a minor scratch from a fall or a significant crack from a more serious incident, knowing how to repair fairings can save you a considerable amount of money. This comprehensive guide will walk you through the process, from assessing the damage to achieving a professional-looking finish.
Assessing the Damage: Knowing What You're Working With
Before you even think about grabbing your tools, carefully assess the extent of the damage. This will determine the repair method and materials you'll need.
Minor Scratches and Abrasions:
- Surface-level scratches: These are often easily fixed with a simple cleaning and polishing. Use a dedicated motorcycle cleaner and a fine-grit rubbing compound to gently remove the scratches.
- Deeper scratches: Deeper scratches might require more work, possibly involving filling with a plastic filler before polishing.
Cracks and Breaks:
- Small cracks: These can usually be repaired with plastic welding or adhesive.
- Large cracks or breaks: Significant damage often necessitates more extensive repairs, potentially involving replacing the damaged section entirely. This might be more cost-effective than attempting a complex repair, especially for intricate fairings.
Essential Tools and Materials:
The specific tools and materials will depend on the severity of the damage. However, some common items include:
- Plastic cleaner: To remove dirt and debris before repair.
- Fine-grit sandpaper: For smoothing rough surfaces before filling or applying adhesive.
- Plastic filler: Specifically designed for plastics; choose a filler that matches the color of your fairing as closely as possible.
- Plastic adhesive: A strong adhesive suitable for plastics; cyanoacrylate (super glue) can work well for smaller cracks.
- Plastic welding rod: Useful for welding larger cracks or breaks.
- Heat gun or hair dryer: To carefully heat and melt plastic filler or welding rod.
- Putty knife: For spreading filler evenly.
- Masking tape: To protect surrounding areas during painting.
- Primer: For preparing the repaired area for painting.
- Touch-up paint: Matching your fairing's color.
- Clear coat: To protect the paint and restore the shine.
- Safety glasses and gloves: Always prioritize your safety when working with tools and chemicals.
Repair Techniques: Step-by-Step Guide
The repair method will depend on the type and extent of the damage. Here are some common approaches:
Repairing Minor Scratches:
- Clean the area: Thoroughly clean the scratched area with a dedicated motorcycle cleaner.
- Apply rubbing compound: Using a fine-grit rubbing compound and a soft cloth, gently rub the scratches until they are less visible or disappear completely.
- Polish: Polish the area with a high-quality motorcycle polish to restore the shine.
Repairing Cracks:
- Clean and prepare: Clean the cracked area and roughen the edges of the crack slightly with sandpaper.
- Apply adhesive (for small cracks): For small cracks, apply a strong plastic adhesive, ensuring proper alignment. Clamp or secure the pieces until the adhesive is completely cured.
- Plastic welding (for larger cracks): For larger cracks, use a plastic welding rod and a heat gun to melt and fuse the plastic together. This requires practice and precision.
- Fill any gaps: Once the welding or adhesive is set, use plastic filler to fill any gaps or imperfections. Allow it to cure completely.
- Sand and smooth: Once cured, sand the filler smooth using progressively finer grits of sandpaper.
- Prime and paint: Apply primer, then touch-up paint, and finish with a clear coat for protection.
Replacing Broken Sections:
For extensive damage, replacing the broken section might be the most practical solution. This typically involves removing the damaged section and carefully installing a replacement part.
Maintaining Your Fairings: Preventing Future Damage
Regular maintenance can help prevent future damage. This includes:
- Regular cleaning: Keep your fairings clean to prevent dirt and debris from accumulating and causing scratches.
- Careful handling: Avoid bumping or dropping your motorcycle, and store it in a safe place to minimize the risk of damage.
Following these steps will help you successfully repair your motorcycle fairings. Remember, patience and attention to detail are crucial for achieving a professional-looking finish. If you’re uncomfortable with any aspect of the repair, consider seeking professional assistance.
Featured Posts
Also read the following articles
| Article Title | Date |
|---|---|
| How To Play Double 9 Dominoes | Mar 25, 2025 |
| How To Identify Torque To Yield Bolts | Mar 25, 2025 |
| How To Manage A Signage Rollout | Mar 25, 2025 |
| How To Keep Up Humidity In A Terrarium | Mar 25, 2025 |
| How To Remove Tint Adhesive From Window | Mar 25, 2025 |
Latest Posts
Thank you for visiting our website which covers about How To Repair Fairings . We hope the information provided has been useful to you. Feel free to contact us if you have any questions or need further assistance. See you next time and don't miss to bookmark.
