How To Repair Motorbike Fairing
Ronan Farrow
Mar 25, 2025 · 4 min read

Table of Contents
How to Repair Your Motorbike Fairing: A Comprehensive Guide
So, your motorbike fairing has taken a hit? Don't despair! While a completely shattered fairing might require replacement, many minor scratches, cracks, and even some more significant damage can be repaired at home, saving you a considerable amount of money. This guide will walk you through the process, offering solutions for various levels of damage.
Assessing the Damage: What Kind of Repair Do You Need?
Before you begin, carefully assess the extent of the damage. This will determine the necessary repair approach and materials.
Minor Scratches and Scuffs:
These are the easiest to fix and often only require polishing or a touch-up paint job. A simple motorcycle fairing scratch remover kit can work wonders here.
Cracks:
Cracks require a more involved repair. Small cracks might be repairable with adhesive and filler, while larger cracks may need more substantial repair methods.
Broken Pieces:
If your fairing is broken into multiple pieces, you'll need to re-assemble the broken parts before proceeding with filling and painting. This may require special adhesives designed for plastics.
Tools and Materials You'll Need:
The exact tools and materials will depend on the severity of the damage, but here's a general list:
- Protective Gear: Safety glasses, gloves, and a dust mask are essential.
- Cleaning Supplies: Mild detergent, water, and clean cloths.
- Sandpaper: Various grits (e.g., 200, 400, 600, 1000, 2000), depending on the repair.
- Plastic Repair Adhesive: Choose an adhesive specifically designed for plastics and the type of plastic your fairing is made from (ABS is common).
- Plastic Filler: Use a filler that's compatible with the adhesive and your fairing material.
- Primer: A plastic primer is crucial for ensuring the paint adheres properly.
- Touch-up Paint: Match the paint to your motorbike's color as closely as possible. You can often get this from your local motorcycle dealer or an automotive paint supplier.
- Clear Coat: To protect the repaired area and give it a smooth, glossy finish.
- Putty Knife or Spatula: For applying filler.
- Sanding Block: For even sanding.
- Masking Tape: To protect areas you don't want to paint.
- Paintbrushes or Spray Gun (optional): For applying paint and clear coat.
Step-by-Step Repair Process:
This process focuses on repairing cracks; for minor scratches, skip to the polishing and painting section.
- Clean the Area: Thoroughly clean the damaged area with mild detergent and water, then allow it to dry completely.
- Prepare the Broken Pieces (if applicable): Carefully align and adhere broken pieces using the plastic repair adhesive. Clamp them in place until the adhesive is fully cured.
- Apply Plastic Filler: Once the adhesive is dry, apply the plastic filler to fill the cracks. Use a putty knife to smooth the filler and ensure it's level with the surrounding surface. Allow the filler to dry completely according to the manufacturer's instructions.
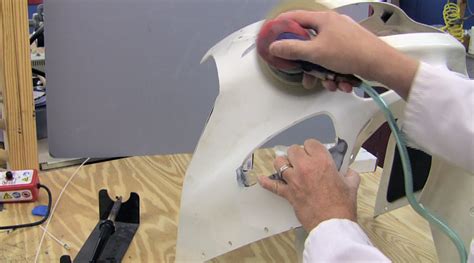
- Sand the Filled Area: Use sandpaper (starting with a coarser grit and progressing to finer grits) to smooth the filler and blend it seamlessly with the surrounding surface. Take your time to avoid sanding too deeply.
- Clean and Prime: After sanding, clean the area again. Apply a thin, even coat of plastic primer, allowing it to dry completely.
- Paint and Clear Coat: Apply the touch-up paint in thin coats, allowing each coat to dry before applying the next. Once the paint is dry, apply several coats of clear coat to protect the repair and give it a glossy finish.
- Final Sanding and Polishing (optional): After the clear coat has fully cured, you can gently sand and polish the repaired area to achieve a perfectly smooth finish.
Polishing and Touch-up Paint for Minor Scratches
For minor scratches, you can often skip steps 2-6. Instead, clean the area, then use a polishing compound or scratch remover to buff out the scratches. Apply a thin coat of touch-up paint if needed, followed by a layer of clear coat for protection.
Maintaining Your Fairing: Prevention is Key
Regular cleaning and waxing can help prevent future damage to your motorbike fairing. Be mindful of where you park your bike to avoid scratches and impacts. Consider investing in a protective cover to shield your bike from the elements.
Remember, patience and attention to detail are key to a successful fairing repair. If you’re unsure about any step, it's always best to seek professional help. But with the right tools and techniques, you can often repair minor to moderate damage yourself and keep your bike looking its best.
Featured Posts
Also read the following articles
| Article Title | Date |
|---|---|
| How To Relieve Tanning Bed Burn | Mar 25, 2025 |
| How To Remove Closet | Mar 25, 2025 |
| How To Repair Fairings | Mar 25, 2025 |
| How To Identify Camel Hump Heads | Mar 25, 2025 |
| How To Install Rv Cover Without Getting On Roof | Mar 25, 2025 |
Latest Posts
Thank you for visiting our website which covers about How To Repair Motorbike Fairing . We hope the information provided has been useful to you. Feel free to contact us if you have any questions or need further assistance. See you next time and don't miss to bookmark.
