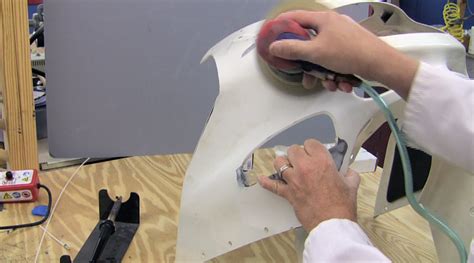
How To Repair Motorcycle Fairings
Ronan Farrow
Mar 25, 2025 · 3 min read

Table of Contents
How to Repair Motorcycle Fairings: A Comprehensive Guide
Repairing your motorcycle fairings can save you a significant amount of money compared to replacing them. This guide will walk you through the process, from assessing the damage to applying the final touches. Remember, safety is paramount – always wear appropriate safety gear, including gloves and eye protection.
Assessing the Damage
Before you begin any repair, it's crucial to accurately assess the extent of the damage. This will determine the best course of action and the necessary materials.
Types of Damage:
- Scratches: Minor scratches can often be buffed out with polishing compound.
- Cracks: Small cracks can be repaired with plastic welding or epoxy resin. Larger cracks might require more extensive repair, potentially including fiberglass patching.
- Holes: Holes require patching, usually with fiberglass mesh and resin.
- Broken Pieces: Missing or severely broken pieces will necessitate more significant repairs and may require replacement parts if the damage is too extensive.
Gathering Your Supplies
The specific materials you’ll need will depend on the severity of the damage, but here's a list of common supplies:
- Safety Glasses: Protect your eyes from flying debris.
- Gloves: Protect your hands from chemicals and sharp edges.
- Masking Tape: To mask off areas you don't want to be affected.
- Sandpaper (various grits): For smoothing surfaces before and after repair. Start with coarser grits (like 80-120 grit) and gradually move to finer grits (like 2000-3000 grit).
- Plastic Welding Kit (or Epoxy Resin): For repairing cracks and holes.
- Fiberglass Mesh/Cloth: For reinforcing repairs, particularly on larger holes.
- Plastic Primer: Helps the paint adhere better to the plastic.
- Paint (matching your fairing color): Choose a high-quality automotive paint for a durable finish.
- Clear Coat: Protects the paint job and gives it a glossy finish.
- Rubbing Compound and Polishing Compound: For smoothing out imperfections after painting.
- Clean Rags: To clean surfaces and apply materials.
- Putty Knife/Plastic Spreader: For applying filler and resin.
Repairing the Damage: Step-by-Step
This section focuses on repairing cracks and holes. Scratches can generally be handled with polishing compound alone.
Cleaning the Damaged Area:
Thoroughly clean the area to be repaired with soap and water. Allow it to dry completely before proceeding.
Preparing for Repair (Cracks):
For cracks, use a plastic welding kit or epoxy resin according to the manufacturer’s instructions. Apply the adhesive to both sides of the crack, carefully aligning the edges. Clamp the pieces together to ensure a strong bond.
Preparing for Repair (Holes):
For holes, cut a piece of fiberglass mesh slightly larger than the hole. Apply a layer of epoxy resin to the back of the mesh and carefully place it over the hole. Apply more resin on top, ensuring the mesh is completely saturated. Let it cure completely.
Sanding and Shaping:
Once the resin has fully cured, use sandpaper to smooth down any imperfections. Start with coarser grits and gradually move to finer grits, achieving a smooth surface.
Priming and Painting:
Apply a layer of plastic primer to the repaired area. Let it dry completely, then apply several thin coats of paint, allowing each coat to dry before applying the next. Finish with a clear coat for protection and shine.
Final Polishing:
After the paint has completely cured, use rubbing compound followed by polishing compound to remove any imperfections and achieve a flawless finish.
Tips for Success
- Patience is Key: Allow adequate drying time between each step. Rushing the process can lead to poor results.
- Thin Coats: Apply thin coats of paint and resin to prevent runs and drips.
- Proper Preparation: Thorough cleaning and sanding are crucial for a successful repair.
- Matching Paint: Try to find a paint that exactly matches your motorcycle’s fairing color. A slight mismatch can be noticeable.
By following these steps and taking your time, you can successfully repair your motorcycle fairings and restore their appearance, saving money and extending the life of your bike. Remember to always prioritize safety and choose the right tools and materials for the job.
Featured Posts
Also read the following articles
| Article Title | Date |
|---|---|
| How To Make Your Maid Of Honor Stand Out | Mar 25, 2025 |
| How To Install Trolling Motor On Pontoon Boat | Mar 25, 2025 |
| How To Make Lids For Oui Jars | Mar 25, 2025 |
| How To Know If A Dentist Takes Your Insurance | Mar 25, 2025 |
| How To Repair Cracked Hardie Board Siding | Mar 25, 2025 |
Latest Posts
Thank you for visiting our website which covers about How To Repair Motorcycle Fairings . We hope the information provided has been useful to you. Feel free to contact us if you have any questions or need further assistance. See you next time and don't miss to bookmark.
