How To Test A Starter Motor On A Motorcycle
Ronan Farrow
Mar 20, 2025 · 4 min read

Table of Contents
How to Test a Motorcycle Starter Motor: A Comprehensive Guide
So, your motorcycle's refusing to start? Before you shell out cash for a new starter motor, let's troubleshoot! This guide will walk you through how to effectively test your motorcycle's starter motor to determine if it's the culprit or if the problem lies elsewhere. We'll cover the basics, using readily available tools, making this process manageable even for beginner mechanics.
Understanding Your Motorcycle's Starting System
Before diving into testing, it's crucial to understand the basic components involved in the starting process:
- Battery: Provides the electrical power. A weak battery is a common cause of starting problems, often mistaken for a faulty starter motor.
- Ignition Switch: Controls the power flow to the starter motor. A malfunctioning switch can prevent the starter from engaging.
- Starter Relay (Solenoid): Acts as a switch, drawing high current to crank the motor. A faulty relay is another frequent suspect.
- Starter Motor: The powerful electric motor that spins the engine to initiate combustion.
Tools You'll Need
Testing your starter motor doesn't require specialized tools. You'll likely need:
- Multimeter: Essential for checking voltage and continuity. A basic digital multimeter is sufficient.
- Screwdrivers: Phillips and flathead, to access the starter motor and battery connections.
- Wrench(es): Appropriate size(s) for removing the starter motor (varies by motorcycle model).
- Gloves: Always protect your hands!
- Safety Glasses: Protect your eyes from potential sparks or debris.
- Motorcycle Service Manual: Highly recommended for specific procedures and wiring diagrams for your motorcycle model.
Step-by-Step Guide to Testing Your Motorcycle Starter Motor
Important Note: Always disconnect the negative (-) battery terminal before starting any electrical work on your motorcycle. This prevents accidental shorts and potential injury.
1. Check the Battery
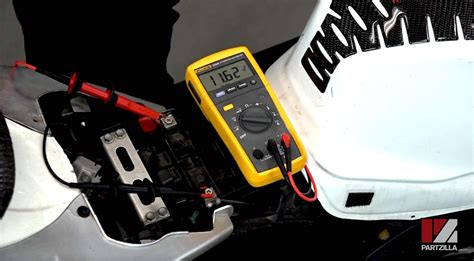
This is the first and most important step. A weak battery will often mimic a bad starter motor. Use your multimeter to check the battery voltage. It should read around 12.6 volts (fully charged). If it's significantly lower, charge the battery or replace it.
2. Inspect the Wiring
Visually inspect the wiring harness connected to the starter motor and the battery for any loose connections, corrosion, or damaged wires. Clean any corroded terminals.
3. Test the Starter Relay (Solenoid)
With the battery connected, use your multimeter to check the relay's continuity. Refer to your service manual for specific testing points on your motorcycle model. A faulty relay will prevent the starter motor from receiving power.
4. Testing the Starter Motor (Directly)
This step requires disconnecting the starter motor from the motorcycle. After disconnecting the battery, carefully remove the starter motor.
- Check for Continuity: Use the multimeter to test the continuity of the starter motor's windings. If there's no continuity, the motor is likely faulty.
- Check for Short Circuits: Check for any short circuits within the starter motor itself.
- Visual Inspection: Carefully examine the starter motor for any physical damage, such as burnt wires or damaged components.
5. Testing the Starter Motor (Indirectly - If Removal is Difficult)
If removing the starter motor proves too challenging, a more indirect test can be performed. This is less precise but can still provide useful insights.
- Listen for the Click: With the ignition key turned to the "start" position, listen carefully. A single click indicates the starter relay is engaging but the starter motor isn't functioning. This strongly suggests a problem with the starter motor itself. A lack of any sound points towards battery, ignition or relay problems.
- Check for Voltage Drop: Use the multimeter to check the voltage at the starter motor's terminals while attempting to start the bike. A significant voltage drop indicates a problem in the circuit (wiring, relay, or starter itself).
Interpreting Your Results and Next Steps
Based on your tests, you should have a clearer picture of the problem:
- Faulty Battery: Replace or recharge the battery.
- Faulty Relay: Replace the starter relay.
- Faulty Wiring: Repair or replace damaged wiring.
- Faulty Starter Motor: Replace the starter motor.
Remember, consulting your motorcycle's service manual is crucial for accurate testing and repair. If you are unsure about any step, seek professional help from a qualified motorcycle mechanic. Safety is paramount when working on your motorcycle.
Featured Posts
Also read the following articles
| Article Title | Date |
|---|---|
| How To Use True Metrix Blood Glucose Meter | Mar 20, 2025 |
| How Do You Know If Youve Been Roofied | Mar 20, 2025 |
| How Deep To Plant Cannabis | Mar 20, 2025 |
| How Do You Become A Sister | Mar 20, 2025 |
| Pet Lift Face Lasts How Long | Mar 20, 2025 |
Latest Posts
Thank you for visiting our website which covers about How To Test A Starter Motor On A Motorcycle . We hope the information provided has been useful to you. Feel free to contact us if you have any questions or need further assistance. See you next time and don't miss to bookmark.
