How To Test An O2 Sensor 4 Wire
Ronan Farrow
Mar 26, 2025 · 3 min read

Table of Contents
How to Test a 4-Wire O2 Sensor: A Comprehensive Guide
Testing your vehicle's oxygen sensor (O2 sensor) might seem daunting, but with the right tools and knowledge, it's a manageable DIY task. This guide focuses on testing a 4-wire O2 sensor, a common type found in many modern vehicles. Remember, safety first! Always disconnect the negative terminal of your car battery before starting any electrical work.
Understanding the 4-Wire O2 Sensor
Before diving into the testing process, let's understand the four wires:
- Heater Circuit (two wires): These wires provide power to the sensor's internal heater, ensuring it reaches operating temperature quickly for accurate readings. A malfunctioning heater can lead to inaccurate readings and poor engine performance.
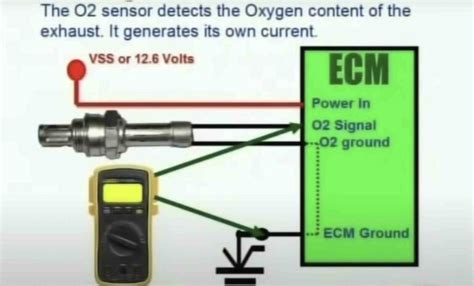
- Signal Wire (one wire): This wire transmits the sensor's readings – the oxygen content in the exhaust – to the engine control unit (ECU). This is the most crucial wire for the sensor's functionality.
- Ground Wire (one wire): This wire provides a ground connection for the sensor, completing the electrical circuit.
Tools You'll Need
To test your 4-wire O2 sensor, you'll need:
- Multimeter: A digital multimeter (DMM) is essential for measuring voltage and resistance. Make sure it's capable of measuring both DC voltage and resistance.
- Wire Connectors/Test Leads: These help you connect your multimeter to the sensor's wires safely.
- Vehicle Repair Manual: Your vehicle's repair manual will provide specific details and diagrams relating to your O2 sensor, its location, and wiring specifics. This is crucial for accurate testing.
- Safety Glasses: Protect your eyes from any potential hazards.
- Gloves (optional): Protect your hands from grease or dirt.
Testing the O2 Sensor Heater Circuit
The heater circuit is usually the first thing to test. A faulty heater can significantly impact the sensor's accuracy.
1. Check for Continuity:
- With the ignition OFF, disconnect the O2 sensor connector.
- Use your multimeter to check for continuity between the two heater wires. Your multimeter should be set to the resistance (Ω) setting.
- If you get a low resistance reading (typically a few ohms), the heater circuit is likely good. A high resistance or open circuit indicates a problem in the heater element or wiring.
2. Check for Voltage:
- Turn the ignition ON (engine OFF).
- Set your multimeter to measure DC voltage (V).
- Connect the multimeter leads to the two heater wires.
- You should see a voltage reading close to the vehicle's battery voltage (usually around 12V). A low or absent voltage reading indicates a problem in the power supply to the heater circuit.
Testing the O2 Sensor Signal Wire
This is the most critical part of the test. This wire transmits the sensor's readings to the ECU.
Note: This test requires the engine to be running. Ensure adequate ventilation and proper safety precautions.
1. Observe Voltage Fluctuations:
- With the engine running, set your multimeter to DC voltage (V).
- Connect one multimeter lead to the signal wire and the other to a good ground.
- The voltage should fluctuate between approximately 0.1V and 0.9V. The signal should be dynamic, and the reading should constantly change as the air/fuel mixture changes. A consistently high or low reading or a lack of fluctuation indicates a potential problem with the sensor or its wiring.
Interpreting Your Results
Based on your readings, you can determine the health of your O2 sensor:
- Heater Circuit: If you found low resistance and battery voltage in the heater circuit, it's functioning properly. Otherwise, the heater circuit needs repair or replacement.
- Signal Wire: Dynamic voltage fluctuation indicates a properly functioning sensor. Consistent readings or no fluctuation suggests a faulty sensor or wiring issue.
When to Replace Your O2 Sensor
If your tests reveal issues with the heater circuit or the signal wire, consider replacing the O2 sensor. A malfunctioning sensor can lead to reduced fuel economy, poor engine performance, and potential damage to your catalytic converter.
This guide provides a general approach. Always consult your vehicle's repair manual for specific instructions and values. If you are unsure about any part of this process, it's best to seek the help of a qualified mechanic.
Featured Posts
Also read the following articles
| Article Title | Date |
|---|---|
| How To Reset Park Assist On Silverado | Mar 26, 2025 |
| Harmonic Balancer How To Install | Mar 26, 2025 |
| How To Stay Positive When You Work With Idiots | Mar 26, 2025 |
| How To Store Swedish Dishcloth | Mar 26, 2025 |
| Lost Thc Thc6000 How To Use | Mar 26, 2025 |
Latest Posts
Thank you for visiting our website which covers about How To Test An O2 Sensor 4 Wire . We hope the information provided has been useful to you. Feel free to contact us if you have any questions or need further assistance. See you next time and don't miss to bookmark.
