How To Thin Oil Based Stain
Ronan Farrow
Mar 26, 2025 · 3 min read

Table of Contents
How to Thin Oil-Based Stain: A Comprehensive Guide
Oil-based stains offer a rich, durable finish for wood projects, but working with them can sometimes be tricky. Knowing how to thin oil-based stain correctly is crucial for achieving a smooth, even application and avoiding unsightly drips or brush marks. This guide will walk you through the process, providing tips and tricks for professional-looking results.
Understanding Why You Need to Thin Oil-Based Stain
Oil-based stains, by nature, are thicker than water-based stains. This thickness can lead to several issues:
- Uneven Application: Thick stain can pool in certain areas, resulting in an uneven color and blotchy finish.
- Brush Marks: Thick stain is more likely to leave visible brush strokes, ruining the smooth aesthetic you're aiming for.
- Difficult Spreading: The thick consistency makes it hard to spread evenly across the wood's surface.
- Long Drying Time: Thinner stain generally dries quicker.
Thinning your stain helps to alleviate these problems, ensuring a flawless and professional-looking finish.
Choosing the Right Thinner
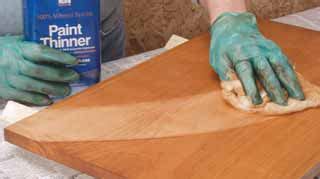
The key to successfully thinning oil-based stain is using the correct thinner. Avoid using anything other than the recommended thinner as incorrect thinners can negatively affect the stain's final appearance and durability. The manufacturer's instructions will specify the best thinner for their particular stain. Generally, however, mineral spirits (also known as white spirits) are the most common and effective thinners for oil-based stains.
How Much Thinner to Use?
The amount of thinner you need will depend on the stain's initial consistency and the desired final viscosity. There's no one-size-fits-all answer, but here's a general guideline:
- Start small: Begin by adding a small amount of thinner (perhaps 10-20%) to your stain. Stir thoroughly and test the consistency on a scrap piece of wood.
- Assess the results: Observe how easily the thinned stain spreads and whether it leaves brush marks.
- Adjust as needed: Add more thinner gradually until you achieve the desired consistency. It's better to add thinner slowly than to add too much at once.
Important Note: Over-thinning can compromise the stain's color intensity and durability. Aim for a consistency that is smooth and easy to apply, but not watery.
The Thinning Process: A Step-by-Step Guide
- Gather your materials: You will need your oil-based stain, mineral spirits (or the manufacturer's recommended thinner), a clean container, and a stirring stick.
- Pour the stain: Pour the required amount of stain into the clean container.
- Add the thinner: Slowly add the thinner, a little at a time, while stirring continuously.
- Stir thoroughly: Ensure the stain and thinner are completely mixed to prevent uneven application.
- Test the consistency: Apply a small amount to a scrap piece of wood to check if it's spreadable and produces the desired finish.
- Adjust as needed: If necessary, add more thinner and stir again.
Tips for Success
- Always work in a well-ventilated area: Mineral spirits have strong fumes.
- Wear appropriate safety gear: Use gloves and eye protection to prevent skin and eye irritation.
- Clean your brushes immediately after use: Oil-based stains can be difficult to clean if left to dry on brushes.
- Dispose of waste properly: Follow local regulations for discarding used thinner and stain.
By following these steps and tips, you can successfully thin your oil-based stain and achieve a beautifully even, professional-looking finish on your next wood project. Remember, practice makes perfect, so don't be afraid to experiment on scrap wood first.
Featured Posts
Also read the following articles
| Article Title | Date |
|---|---|
| How To Unclog A Rv Toilet Holding Tank | Mar 26, 2025 |
| How To Survive Jail As A Woman | Mar 26, 2025 |
| How To Tell Transmission Is Slipping | Mar 26, 2025 |
| American Security Safe How To Open | Mar 26, 2025 |
| Thats Not How U Do It | Mar 26, 2025 |
Latest Posts
Thank you for visiting our website which covers about How To Thin Oil Based Stain . We hope the information provided has been useful to you. Feel free to contact us if you have any questions or need further assistance. See you next time and don't miss to bookmark.
