How To Wire Blinkers On A Motorcycle
Ronan Farrow
Mar 20, 2025 · 4 min read

Table of Contents
How to Wire Blinkers on a Motorcycle: A Comprehensive Guide
Adding turn signals (blinkers) to your motorcycle significantly enhances safety and visibility on the road. This guide provides a step-by-step approach to wiring blinkers, catering to both beginners and those with some electrical experience. Remember, safety is paramount; if you're unsure about any step, consult a qualified motorcycle mechanic.
Essential Tools and Materials
Before you begin, gather these essential items:
- New Blinkers: Choose blinkers that are compatible with your motorcycle's voltage (typically 12V). Consider their style and placement for optimal visibility.
- Wiring Harness: This will depend on your motorcycle's existing wiring. You might need a dedicated motorcycle flasher relay designed for LEDs or incandescent bulbs (this is crucial!). Consider using a sealed waterproof relay for added protection.
- Wire Connectors: Crimp-on connectors are ideal for secure and waterproof connections. Avoid using tape.
- Wire Strippers/Cutters: To cleanly cut and strip the wire insulation.
- Soldering Iron (Optional but Recommended): Provides stronger and more reliable connections than crimp connectors alone. Solder all connections and then use heat shrink tubing.
- Electrical Tape (Optional): Use sparingly as a supplementary layer of protection after soldering and using heat shrink.
- Test Light or Multimeter: To verify the wiring and functionality.
- Screwdriver (Appropriate size): For mounting the blinkers and accessing wiring compartments.
Understanding Your Motorcycle's Electrical System
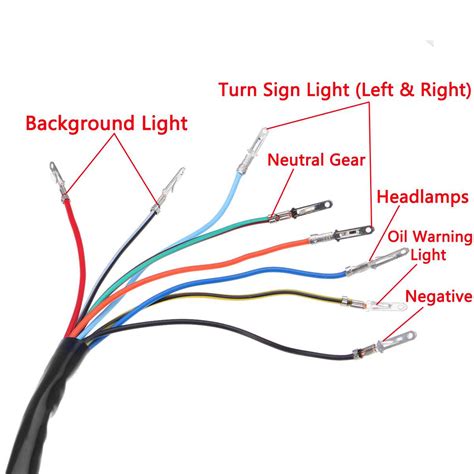
This is a critical step. Consult your motorcycle's wiring diagram. This diagram shows the location of the turn signal wires (usually a pair for each side, a left and a right), the flasher relay, and the battery. Incorrect wiring can damage your motorcycle's electrical system.
- Locate the Flasher Relay: This component controls the blinking function of your turn signals.
- Identify the Turn Signal Wires: These wires are typically color-coded, but colors vary between models.
Wiring the Blinkers: Step-by-Step Guide
This guide assumes you're adding blinkers to a motorcycle that doesn't already have them. If you're replacing existing blinkers, the process will be similar, but you'll be disconnecting and replacing the old ones.
-
Prepare the Blinkers: Mount the blinkers securely in their chosen locations. Ensure they are firmly attached and won't vibrate loose.
-
Run the Wires: Carefully route the wires from the blinkers to a central point, typically near the battery or fuse box, minimizing exposure to heat and potential damage. Use wire ties or cable clamps to keep the wires organized and prevent them from interfering with moving parts.
-
Connect the Wires: This is where the wiring diagram comes into play. Connect the blinker wires to the correct wires in your motorcycle's electrical system. Remember: positive (+) to positive and negative (-) to negative.
-
Connect to the Flasher Relay: Connect the wires from your blinkers to the appropriate terminals on the flasher relay. Incorrect connections here will lead to malfunctioning blinkers. The relay is essential for making the lights flash at the correct rate. LED blinkers often require a specific LED flasher relay to function correctly.
-
Test the Connection: Use your test light or multimeter to verify the wiring. Make sure there is continuity and that power is flowing correctly.
-
Secure all Connections: Once you've verified the connections, secure them using crimp connectors and solder. Use heat shrink tubing over all soldered connections. This is essential for a safe and waterproof system.
-
Test the Blinkers: Turn on your ignition and activate your turn signals. Check that the blinkers flash at the correct rate and that both sides are working.
Troubleshooting
- Blinkers not working at all: Check all your connections. Verify the fuse is not blown. Ensure your flasher relay is functioning correctly.
- Blinkers flashing too fast: This typically means the bulbs are drawing too little current, usually related to LED bulbs without the correct relay. Use an LED compatible flasher relay.
- One side not working: Focus on the connections for that particular side. Check for broken wires.
Safety First!
Remember to disconnect the battery's negative terminal before starting any electrical work on your motorcycle. This prevents accidental short circuits that can damage your bike’s electrical system. Always prioritize safety when working with electricity. If you're uncomfortable with any of these steps, consult a qualified motorcycle mechanic. Your safety is more important than any DIY project.
Featured Posts
Also read the following articles
| Article Title | Date |
|---|---|
| Elfthc How To Use | Mar 20, 2025 |
| How Do I Believe In God Again | Mar 20, 2025 |
| How Big Is 8x12 Picture | Mar 20, 2025 |
| How To Wire In Daytime Running Lights | Mar 20, 2025 |
| How Difficult Is It To Learn To Play The Banjo | Mar 20, 2025 |
Latest Posts
Thank you for visiting our website which covers about How To Wire Blinkers On A Motorcycle . We hope the information provided has been useful to you. Feel free to contact us if you have any questions or need further assistance. See you next time and don't miss to bookmark.
